Web EDI Fulfillment
Web EDI Fulfillment lets you view, create, and edit EDI documents from a web-based interface. Related transactions are automatically grouped together into workflows, and you can create new documents with pre-populated data. This means you can trade EDI documents without having to build an integration to any existing system of record.
Easy Viewing and Management: The modern UI simplifies the viewing of EDI documents, making it easy to receive, review, create, edit, and send EDI transactions.
Automation for Efficiency: Orderful automates the creation and sending of transactions, ensuring fast acknowledgments, fulfillment, and invoicing.
Guided Tracking: The platform's tracking capabilities provide visibility into order fulfillment and retailer requirements. This makes it easy for you to ensure that you stay in compliance.
Supported Documents:
- Receive a Purchase Order (850) from your Trading Partner
- Send a Purchase Order Acknowledgement (855) to your Trading Partner to confirm details and quantities that will be shipped
- Send an Advance Ship Notice (856) to your Trading Partner describe the contents and configuration of a shipment in various levels of detail.
- Send an Invoice (810) to your Trading Partner
Before you start
This documentation assumes that you have:
- An Orderful organization with:
- At least one EDI Account
- At least one Trading Partner with which you trade one of these document types: 850, 855, 810
- If you don’t have a Trading Partner, you can set up a new Relationship by following these instructions: Set up a Trading Partnership as a Follower
- An Orderful account with access to this organization
- Completed Scenario Testing with your Trading Partner
- Optional: An existing System of Record that you will use to track invoices, inventory, etc.
Workflows and Order Fulfillment
Transactions are grouped into Workflows based on a shared common reference. For example, an 850 and a corresponding 810 will be grouped into a Workflow if they share a common Purchase Order Number.
The overview page for all Workflows is the Order Fulfillment page: https://ui.orderful.com/order-fulfillment
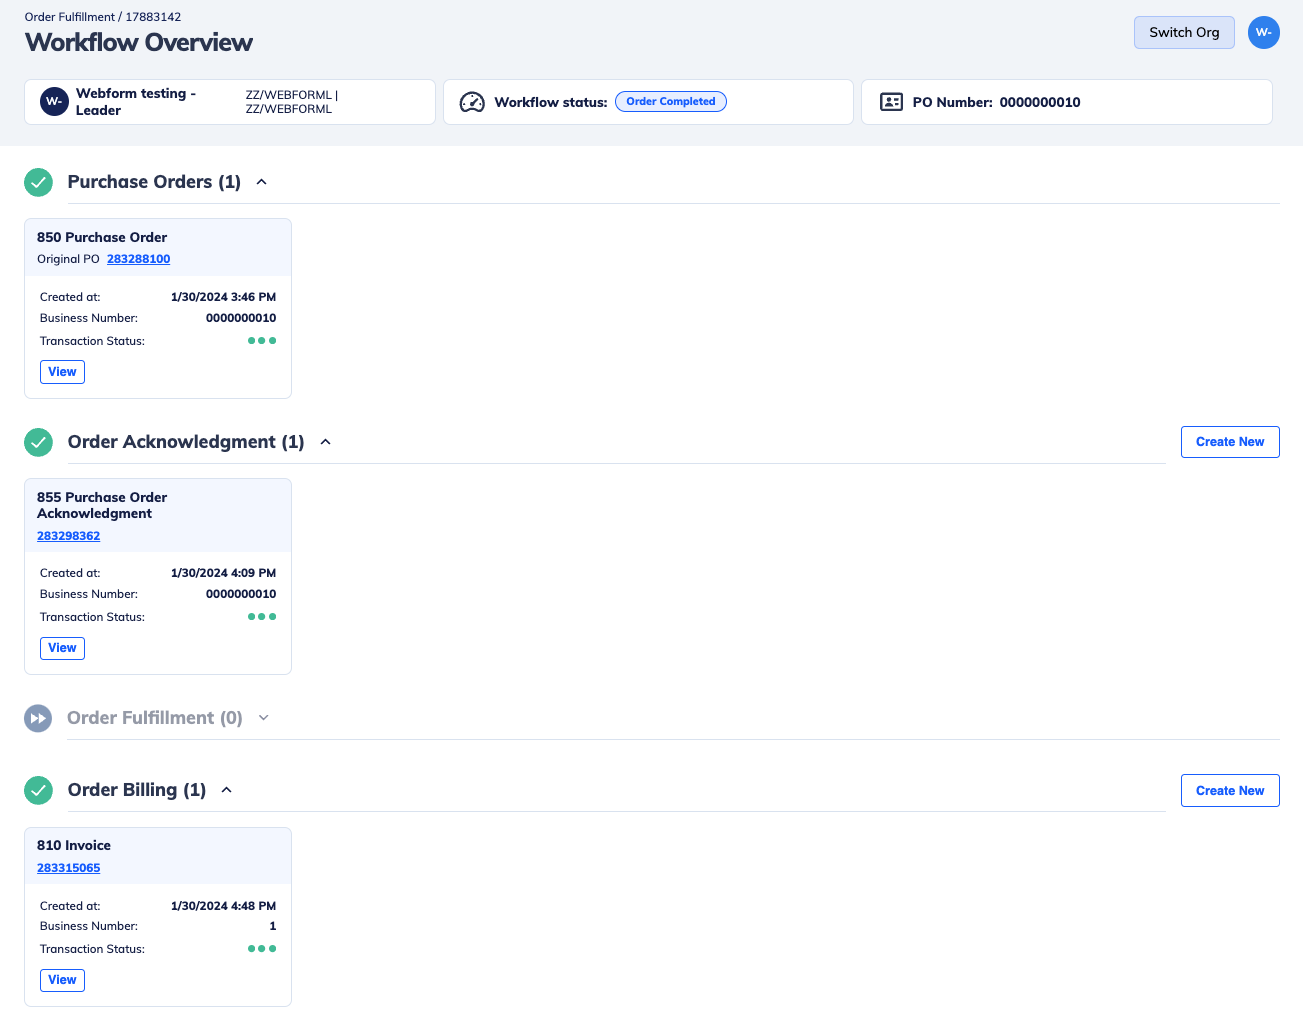
The Workflow page shows you:
- The name and ISA ID and Qualifier of your Trading Partner
- The status of this Workflow. One of the following:
- “Order Pending”
- “Order Acknowledgment”
- “Order Fulfillment”
- “Order Billing”
- “Order Completed”
- “Order Canceled”
- The reference that is the basis for this Workflow (for example, the Purchase Order Number)
- All related Transactions, grouped by their step in the Workflow
For each incomplete step, you can either:
- Create a new Transaction with auto-populated values, or
- Skip that step
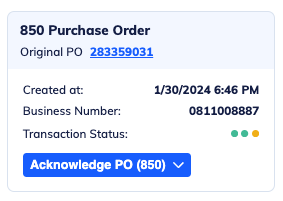
Each document will also have the next action available on it in the form of a blue button:
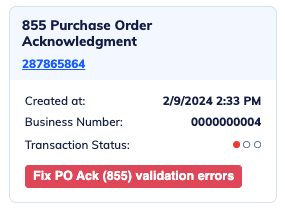
Or a red button in the case of validation, delivery or acknowledgment errors:
Receive an 850 Purchase Order
An 850 Purchase Order is the first step in a Retail Workflow. The Purchase Order Number in this document is used to create a Workflow.
Required Workflow status: None
- If the data is not already in Orderful, you can upload the EDI document by going to your Transactions page and clicking on Create Transaction > Upload Transaction. A notification will appear on the bottom of the page, along with a link to refresh the page. When you refresh this page, the new Transaction you uploaded should now be visible.
- Click on the 850 Purchase Order. If you now select Print View you can see all the data from this Transaction in a human-readable format. At the bottom you will see information about the related Workflow, including its status, which step you are on, and a link to the associated Workflow Overview.
- (Optional) Enter the data into your SOR.
- (Optional) To acknowledge receipt of this Purchase Order, click on the Acknowledgement Status and select Accepted. You will be prompted to confirm that you are accepting the transaction.
Tip: You can allow Orderful to auto-accept incoming 850 Purchase Orders if you turn off the setting "I will send functional acknowledgements in response to inbound transactions" on the corresponding Relationship.
- Click on the Workflow Overview to see the next available steps.
Send an 855 Purchase Order Acknowledgement
An 855 Purchase Order Acknowledgement is the second step in a Retail Workflow. The Purchase Order Acknowledgement is a response to your Trading Partner that indicates the order is either fulfillable as requested or can be fulfilled with some changes.
Required Workflow status: Order Acknowledgement
- If you haven’t already, open the associated Workflow Overview.
- If the 850 Purchase Order has been acknowledged, the Workflow status will be “Order Acknowledgement”.
- Click on Create PO Ack (855) in the “Order Acknowledgement” step.
- (Optional) If you are creating multiple 855s (for example because some items are backordered), you can use the Create New button for the Order Acknowledgement step.
- This will create a new 855 document and open the Print View for that transaction in Edit Mode. This document will be auto-populated based on the data in the 850 that started this Workflow. Any validation errors, including missing information, will be highlighted in red.
- Select a “Type” for this Purchase Order Acknowledgement.
- For each Line Item row, select an Acknowledgment “Status”.
Tip: If you select the type "AK" (Acknowledge - No Detail or Change) or RJ ("Rejected - No Detail"), you can select all line items and delete them from the 855 document as these types acknowledge all items at once.
- Once you are done, click Save Changes in the upper right.
- Click on the Send button () at the top of the Transaction detail view.
- (Optional) To download the 855 transaction, click on the Download button () at the top of the page. This will open a Download Files dialogue that will show you the data in the format(s) configured for your Relationship, as well as giving you the option to Download and Copy the data.
Send an 856 Advance Shipping Notice
An 856 Advance Shipping Notice (ASN) is the key step of many Retail Workflows. The ASN enables the sender to describe the contents and configuration of a shipment in various levels of detail.
All requirements for the 856 document are based on your Trading Partner’s Guidelines. Available packing methods and validation criteria are specified by your Trading Partner, and Orderful only enforces them as configured.
Required Workflow status: Order Fulfillment
- If you haven’t already, open the associated Workflow Overview.
- If the required previous steps have been completed, the Workflow should be in “Order Fulfillment” status.
Click on Create an ASN (856) in the “Order Fulfillment” step. - This will create a new 856 document and open the Print View for that transaction in Edit Mode. This document will be auto-populated based on the data in the 850 that started this Workflow. Any validation errors, including missing information, will be highlighted in red. These errors are based on your Trading Partner’s guidelines.
- (Optional) Choose a packing method. If your Relationship only specifies one packing method, this will be pre-selected.
- Enter a “Shipment ID”.
- The “Shipment Date” will default to the current date. Update this field if necessary.
- Confirm all pre-populated fields, and fix any validation errors highlighted in red.
- All items specified in the 850 are unpacked by default. You must explicitly select each item in the “Unpacked Items” section and specify how many units are being packed. The number of units you are packing can be less than the total quantity that is being shipped, to account for multiple cartons or pallets. For more information see [How to use Unpacked Items].
- All items, once packed, will appear in the “Items” section below.
- Once you are done, click Save Changes in the upper right.
- If you have successfully entered all the information required by your Trading Partner’s Guidelines, the 856 document will change its “Validation Status” from “Invalid” to “Valid”. The Transaction can now be sent.
Click on the Send button () at the top of the Transaction detail view. - (Optional) If you are creating multiple 856s, you can use the Create New button for the Order Fulfillment step.
- (Optional) To download the 856 transaction, click on the Download button () at the top of the page. This will open a Download Files dialogue that will show you the data in the format(s) configured for your Relationship, as well as giving you the option to Download and Copy the data.
How to use Unpacked Items
All Items in an 856 are not packed by default. When you select an item, enter a quantity, and pack the item(s) using the Pack Items button at the top right of the table. Packed items are moved into the “Items” section of the Purchase Order below. All of the item-level details are also added.
It is important that you only pack units together if they are inside common packaging. If you make a mistake you can scroll down to the Items section and delete the items individually in the table, or any packs or tares (pallets) that contain those items.
Send an 810 Invoice
An 810 Invoice is normally the last step in a Retail Workflow and will typically only be accepted by the retailer after they have received and acknowledged an 856 Advance Shipment Notice. The 810 Invoice indicates the charges due, and requests payment according to agreed-upon terms.
Required Workflow status: Order Billing
- If the previous steps have been completed, the Workflow status will be “Order Billing”.
- Click on Create Invoice (810) in the “Order Billing” step.
- This will create a new 810 document and open the Print View for that transaction in Edit Mode. This document will be auto-populated based on the data in the original Purchase Order. Any validation errors, including missing information, will be highlighted in red.
- (Optional) If you are creating multiple 855s (for example because your last invoice was rejected), you can use the Create New button for the Order Billing step.
- Enter an “Invoice Number” and “Total” as well as any other information that you want.
Double-check if you need to enter:
- Any allowances, promotions, discounts or charges to your invoice.
- Any billing contact / addresses
- Specific payment terms
- Once you are done, click Save Changes in the upper right.
- Click on the Send button () at the top of the Transaction detail view.
- (Optional) To download the 810 transaction, click on the Download button () at the top of the page. This will open a Download Files dialogue that will show you the data in the format(s) configured for your Relationship, as well as giving you the option to Download and Copy the data.
Updated 30 days ago