Create a Transaction
Pre-requisites
Before you can create a Transaction you must have:
- Set up your Organization
- Set up a Trading Partnership
Create a Transaction
In most instances, EDI transactions will be created by your System of Record (SOR) and then passed on to Orderful. However there are situations where you may want to enter a transaction directly into Orderful, for example for testing purposes.
The transaction must correspond to an existing, configured Relationship in Orderful. This means that, in order to send a test transaction, you must have at least one inbound Relationship configured.
Transactions must be:
- in EDIFACT, JSON, or X12 format
- 50MB or less for EDIFACT/X12 files
- 100MB or less for JSON files
To create a Transaction you can:
- Upload a file
- Make an API call
- Make an API using our API Explorer
- Send a file to your outbound Communication Channel
Upload a file
To upload a transaction in a file:
- From the left navigation menu, click on Transactions.
- Click on Create New and select Upload transaction.
- Choose the file you want to upload.
Transaction files in X12 format can use
.txt,.x12or.ediextensions, while files in JSON format must use the.jsonextension. For more information about how the file contents must be structured see format information below.
File format for EDIFACT
- Start with a UNB segment.
- Have at least one interchange envelope (UNB/UNZ segments).
- Have at least one transaction set (UNH/UNT segments).
- Respect the presence and order of loops, segments, and elements defined by the EDIFACT standards for each transaction type inside each transaction set.
File format for JSON
Files containing JSON must use the following structure. The contents of your transaction should be entered into the message object.
To see the possible Transaction Type values, see Available Transaction Types.
{
    "type": {
        "name": "TRANSACTION_TYPE_NAME"
    },
    "stream": "test",
    "message": {
        [...] // Enter your data here
    },
    "sender": {
        "isaId": "ISA_ID_SENDER"
    },
    "receiver": {
        "isaId": "ISA_ID_RECEIVER"
    }
}
File format for X12
Files in the X12 format must:
- Start with an ISA segment.
- Have at least one interchange envelope (ISA/IEA segments).
- Have at least one functional group inside each interchange envelope (GS/GE segments).
- Have at least one transaction set inside each functional group (ST/SE segments).
- Respect the presence and order of loops, segments, and elements defined by the X12 standards for each transaction type inside each transaction set.
Any File Format
Any File transactions can't be created by upload.
Make an API call
- EDI: You can create a Transaction by sending an HTTP POST to the Orderful API's
/transactionsendpoint. - Any File: You can create a Transaction by sending an HTTP POST to the Orderful API's
/transactions/rawendpoint.
You can only create one Transaction at a time.
For help generating the content of the transaction, see Generating an example payload. For a full description of this endpoint, please see Create a Transaction (EDI) and Create a Transaction (Any File).
Make an API call using our API Explorer
Orderful's API Explorer is integrated into our REST API reference.
- Sign in to your Orderful account:
- Orderful US: https://ui.orderful.com
- Orderful EU: https://ui-eu.orderful.com
- Click on your icon in the upper right of the Orderful UI landing page, then select "Settings" from the drop-down.
- Under "Organization Settings" select API Credentials.
- Copy the your API key and paste it into the "Authentication".
- Go to the Get your organization details page on the API Reference.
- You can test that you've entered your API key correctly by retrieving your Org details.
- On the right side of the page, under the payload, click on "Try It!"
- You should receive an
HTTP 200response with your Org details in it.
- Go to the Create a Transaction (EDI) and Create a Transaction (Any File) on the API Reference.
- On the “Create a Transaction” page, make sure that the “Language” on the right side is “Shell” and in the “Request” section click on Examples > Request Example. This will create an example JSON payload with the correct structure and placeholder values.
- Get your (sender)
isaIdand the receiver’sisaId.
In Orderful, from the left navigation menu, click on Relationships to see the ISA IDs of your relationships.
- Get the contents of your document in JSON format or Any File format.
- For Any File, add the routing headers:
orderful-sender-id,orderful-receiver-id,orderful-transaction-type,orderful-stream,orderful-business-numberand add the raw file as a Body Params. - For JSON format, you should fill out the “Body Params” section of the page:
- Add a
typeobject with aname. The value of thenameshould be from our list of available Transaction types. For example:850_PURCHASE_ORDER - Indicate which
streamyou’d like to create this Transaction in. This will probably betest. - Next, copy the contents of your document into the
messagebox. - Add a
senderobject, then yourisaId. - Add a
receiverobject, then the receiver’sisaId.
- Add a
- Once everything is filled out, click on Try It! You should receive a 201 response, with a Transaction
idin the response.
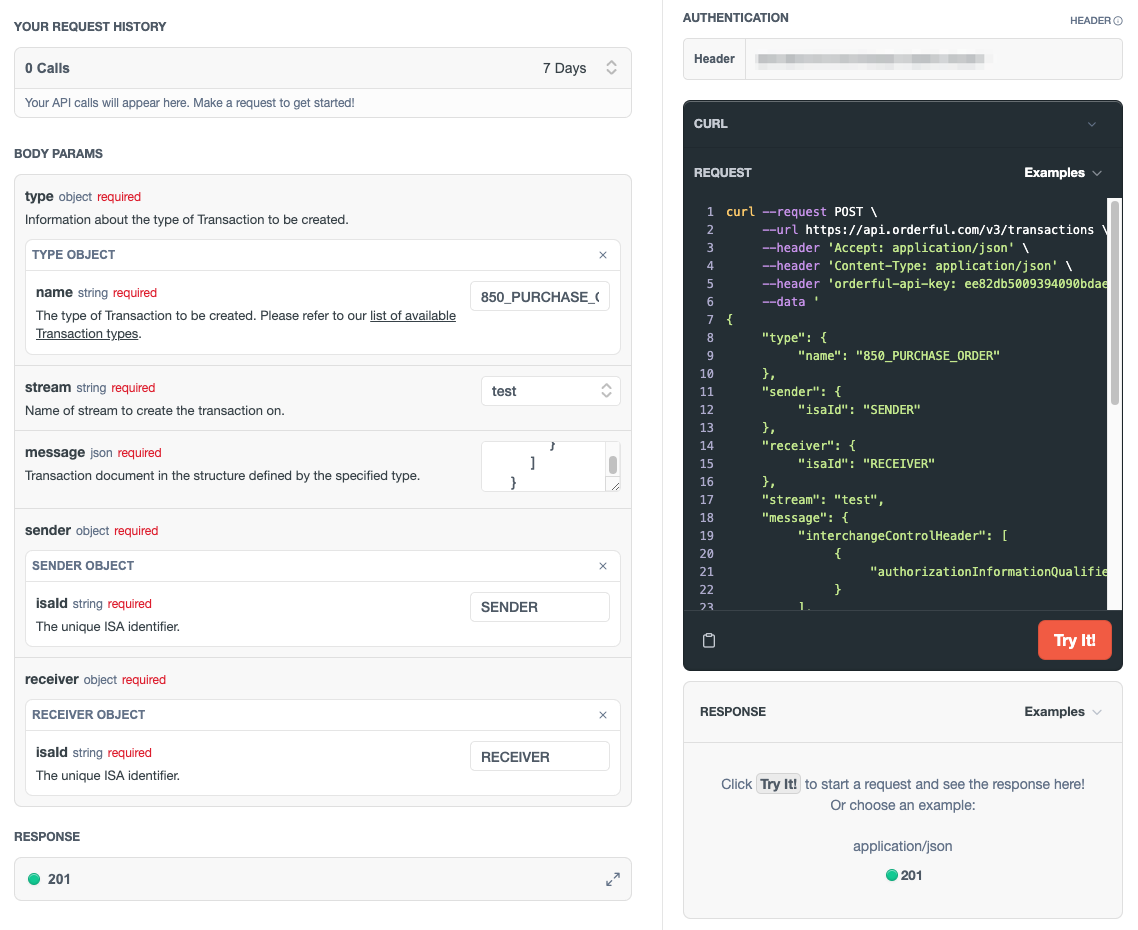
This is what the completed form should look like.
Send a file to your outbound Communication Channel
If you are using an outbound Communication Channel like AS2, FTP, or VAN, you can send the file using this system. The details of how this is done will depend on your implementation.
Updated 12 days ago